Ola Cabs, also known as Ola, is a big online platform that started in 2010 and helps people book rides using the website or the app on their phones in many cities (250+) near their location for the best fares. Ola has become one of the largest ride-sharing companies in India and has expanded its services to other countries like Australia, New Zealand, and the UK. They offer different kinds of rides like taxis, auto-rickshaws, bikes, and even electric vehicles. Ola allows you to see where your ride is on the map, pay without cash, schedule your rides for later, and give feedback about your ride and drivers.
These are some ride-booking platforms and apps similar to Ola:
- Uber
- Lyft
- Meru Cabs
- Rapido
- DriveU
- Cabify
- Didi Chuxing
- Grab
So, if you are looking for how to create a website like Ola using WordPress, this article has got you covered! We’ll walk you through the entire process, explaining every step in simple terms. Whether you’re new to WordPress or already familiar with it. We’ll share the plugins, themes, and features needed to build a user-friendly platform for booking rides, managing user accounts, and handling payments.. etc.
Difficulty level: Straightforward.
Cost: Creating a site like Ola, will cost you around $90 for the first year (the price includes the web hosting, the domain name, and the similar WordPress theme to Ola), and then you’ll pay only for the domain name and the hosting for the upcoming next years.
Quick navigation (click to jump):
- Get the right hosting and domain name
- Install WordPress with 1 click
- Choose the right website theme (similar to Ola)
- Plug-ins Installation
- Install Demo Content
- Importing widgets
- Add destinations
- Add transport types
- Configure payment options
- Launch your site
Get the right hosting and domain name
Bluehost is a good home for hosting a site like Ola Cabs.. since it comes at much cheaper prices than other hosting companies, it also provides great support, security, 1 click WordPress installation, free domain name.. etc.
To get yours, kindly follow these steps:
- Visit the Bluehost hosting page
- Select the basic shared plan ($2.95/mo)
- Enter a new domain name
- Enter your account information
- Enter your billing information
- Complete your purchase after reviewing your order
Install WordPress with 1 click
WordPress is a simple dashboard from where you can manage, add content, and customize your site. To install it on your Bluehost hosting:
- Log in to your Bluehost account
- Click the Hosting tab from the left sidebar
- Click “Add Site”
- Select “Install WordPress”
- Click “Continue”
- Enter your site’s title
- Select or enter your domain name (which you just purchased)
- Click “Continue”
Choose the right website theme (similar to Ola)
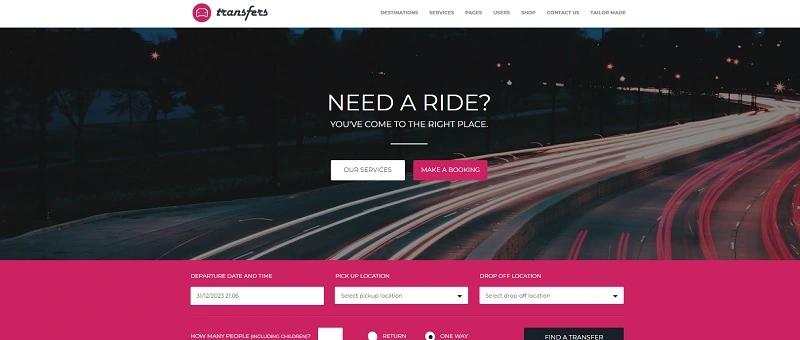
After long research, we have found the Transfers theme, which has the same functionalities as Ola, it comes with a powerful booking system and advanced search results. You can create any and as many transport or vehicle types as well as any destination in the world. Great alternative to GetCab.

To install it:
- Go to your WordPress dashboard → Appearance → Themes → Add New
- Click “Upload the Theme”
- Choose your zip file
- Click “Install”
Plug-ins Installation
The theme requires some plugins that need to be installed, like Revolution Slider, Transfers, and WooCommerce. To install them:
- Go to WordPress dashboard → Appearance → Install Plugins
- Select All
- Click “Install”
Install Demo Content
First, locate the folder called SampleData, in your downloaded zip file.
- Go to WordPress dashboard → Tools → Import
- Enable the WordPress import tool
- Click “Browse” and select transfer.sample.xml file
- Enable “Download and import file attachments”
- Click “Submit”
Importing widgets
To fully replicate their demo website, it’s very recommended to import widgets as well.
- Install the “Widget importer & Exporter” plugin by navigating to Plugins → Add New
- Locate the “transfers-widgets.wie” file found in the SampleData folder and import it by using the plugin
You can check out now your site’s new look by hovering over your site’s name (top left), and clicking “Visit Site”.
Add destinations

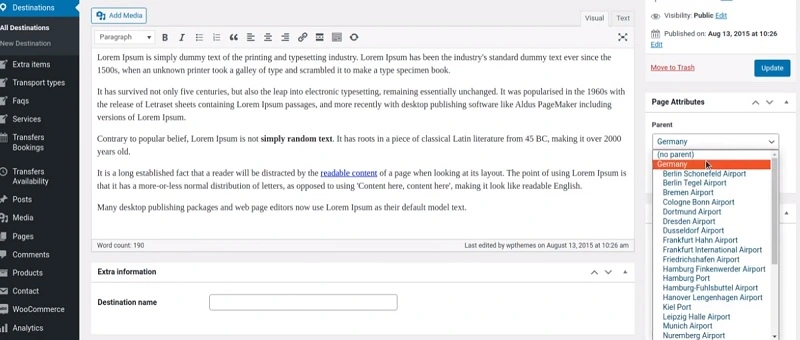
To add these Pickup and Drop locations, it’s very easy:
- Navigate to Destinations → New Destination
- Enter the destination name and description
- Select the parent destination (the country for example)
- Add a picture if needed
- Click “Publish”
Add transport types
For the vehicles, it’s similar to destinations, just head to Transport types → New Transport type. Enter the vehicle type and other details, and click “Publish”.
Configure payment options
Now and finally, for the payment, you’ll need to configure the WooCommerce plugin (which is already installed). To do that:
- Click on WooCommerce on your dashboard’s left sidebar → Settings
- Enter your business details
- Enable Stripe, PayPal, and/or other payment methods
- Enable WooCommerce Payments
- Enable Apple Pay and Google Pay
Launch your site
Now before launching your site, make sure everything works like a charm, double check that every button clicks, the pages load smoothly, the booking form is working, the payment methods are working, and it’s responsive (looks great on phones, tablets, and computers as well).